First Steps with Kuartz
1 Installation
- • Download Kuartz for macOS or Windows
- • Run the installer and follow on-screen instructions
- • Launch Kuartz - free trial gives you full features with session limits
- • No credit card required for trial
2 Audio Setup
- • Go to Settings → Audio Device
- • Select your audio interface as output device
- • Configure output routing for Master and Preview
- • Adjust buffer size for optimal latency (32-2048 samples)
3 Import Your Music
- • Navigate to your music folder in the browser panel
- • Supported formats: WAV, MP3, AIFF, FLAC, OGG, M4A
- • Kuartz automatically analyzes BPM, key, and energy
- • Create playlists to organize your library
4 Connect Your Controller
- • Connect your MIDI controller via USB
- • Go to Settings → Controller Manager
- • Kuartz detects your controller automatically
- • Create custom mappings for full control
Your First Mix
Learn the basics of mixing in Kuartz with this step-by-step guide. In just a few minutes, you'll create your first seamless transition.
Load Your First Tracks
Start by adding two tracks to your timeline. This is where Kuartz differs from traditional DJ software - you'll arrange your tracks visually on a timeline, similar to a DAW.
From the Browser
- 1. Navigate to your music folder in the browser panel
- 2. Click on a track to select it
- 3. Drag the track onto Deck 1 in the timeline
- 4. Repeat for your second track on Deck 2
Pro Tip
Wait for the analysis to complete (check the Status column) before adding tracks. This ensures BPM and key information is available for sync and harmonic mixing.
Match the Tempo
Unlike traditional DJ software where each deck has its own tempo, Kuartz uses a global BPM. All tracks are time-stretched to match this master tempo, keeping everything perfectly in sync.
Setting Global BPM
- • Look at the BPM display in the top bar
- • Click the value to type a specific BPM
- • Or drag up/down for fine adjustment
- • Use +/- buttons for 0.1 BPM changes
Choosing the Right BPM
Set the global BPM close to your tracks' original tempo. Large tempo changes (more than 8%) may affect audio quality. For best results, choose tracks with similar BPMs.
Position Your Transition
The magic of timeline mixing is seeing exactly where your tracks overlap. Position the second track so it starts playing before the first track ends - this overlap is your transition zone.
Moving Clips
- • Click and drag the center of a clip
- • The clip snaps to the beat grid
- • Release to place the clip
Trimming Clips
- • Drag the left edge to set start point
- • Drag the right edge to set end point
- • Perfect for cutting intros/outros
Overlap Length
A typical transition is 16-32 beats (4-8 bars). Start with longer overlaps while learning - they're more forgiving.
Blend with EQ
The EQ is your main tool for smooth transitions. The key is to avoid having two bass lines playing at full volume simultaneously - they'll clash and sound muddy.
Basic EQ Transition
- 1. Start with Track 2's LOW EQ at minimum (cut)
- 2. As you approach the transition point, gradually bring Track 2's LOW up
- 3. Simultaneously cut Track 1's LOW
- 4. The "bass swap" is when you exchange the lows
The Filter Alternative
Instead of EQ swaps, try the Xone-style filter. Sweep it from center toward highpass on Track 1 while sweeping Track 2 from lowpass toward center. This creates a smooth, sweeping transition effect.
Control the Energy
Use the volume faders to control the relative levels of each track during the transition. This helps maintain consistent energy and prevents your mix from getting too loud in the overlap.
Volume Faders
- • Drag the triangle markers on the VU meter
- • Watch the meters - avoid red (clipping)
- • Double-click to reset to 0dB
- • Use headroom setting if needed
Preview in Headphones
Click the headphone button on a track to preview it in your headphones without affecting the main output. This lets you cue up the next track and check your mix before it goes live.
Play and Refine
Now it's time to hear your mix! Press Space (or click Play) to start playback. Listen to the transition and make adjustments as needed.
What to Listen For
- • Beats should stay aligned
- • No bass clashing
- • Smooth energy flow
- • No sudden volume jumps
Make Adjustments
- • Pause and reposition clips
- • Adjust EQ settings
- • Try different overlap lengths
- • Experiment with the filter
Save Your Work
Use File → Save Project to save your timeline. You can come back later to continue refining or add more tracks to build a full set.
Next Steps
Now that you've created your first transition, explore these advanced techniques:
Top Bar Controls
The top bar provides quick access to transport controls, BPM, and system status.
Playback Controls
Play
Start timeline playback
Pause
Pause at current position
Stop
Stop and return to start
Global BPM Control
Set the master tempo for your entire set (1-300 BPM).
| Action | Result |
|---|---|
| Click on value | Direct text editing |
| Drag vertically | Continuous adjustment |
| +/- buttons | Adjust by 0.1 BPM (hold for auto-repeat) |
| Double-click | Reset to default value |
Status Indicators
Audio
- Connected
- Error
MIDI
- Inactive
- Activity detected
Audio Thread CPU Usage
- <50% Normal
- 50-80% Warning
- >80% High load
VU Master
Real-time stereo output levels
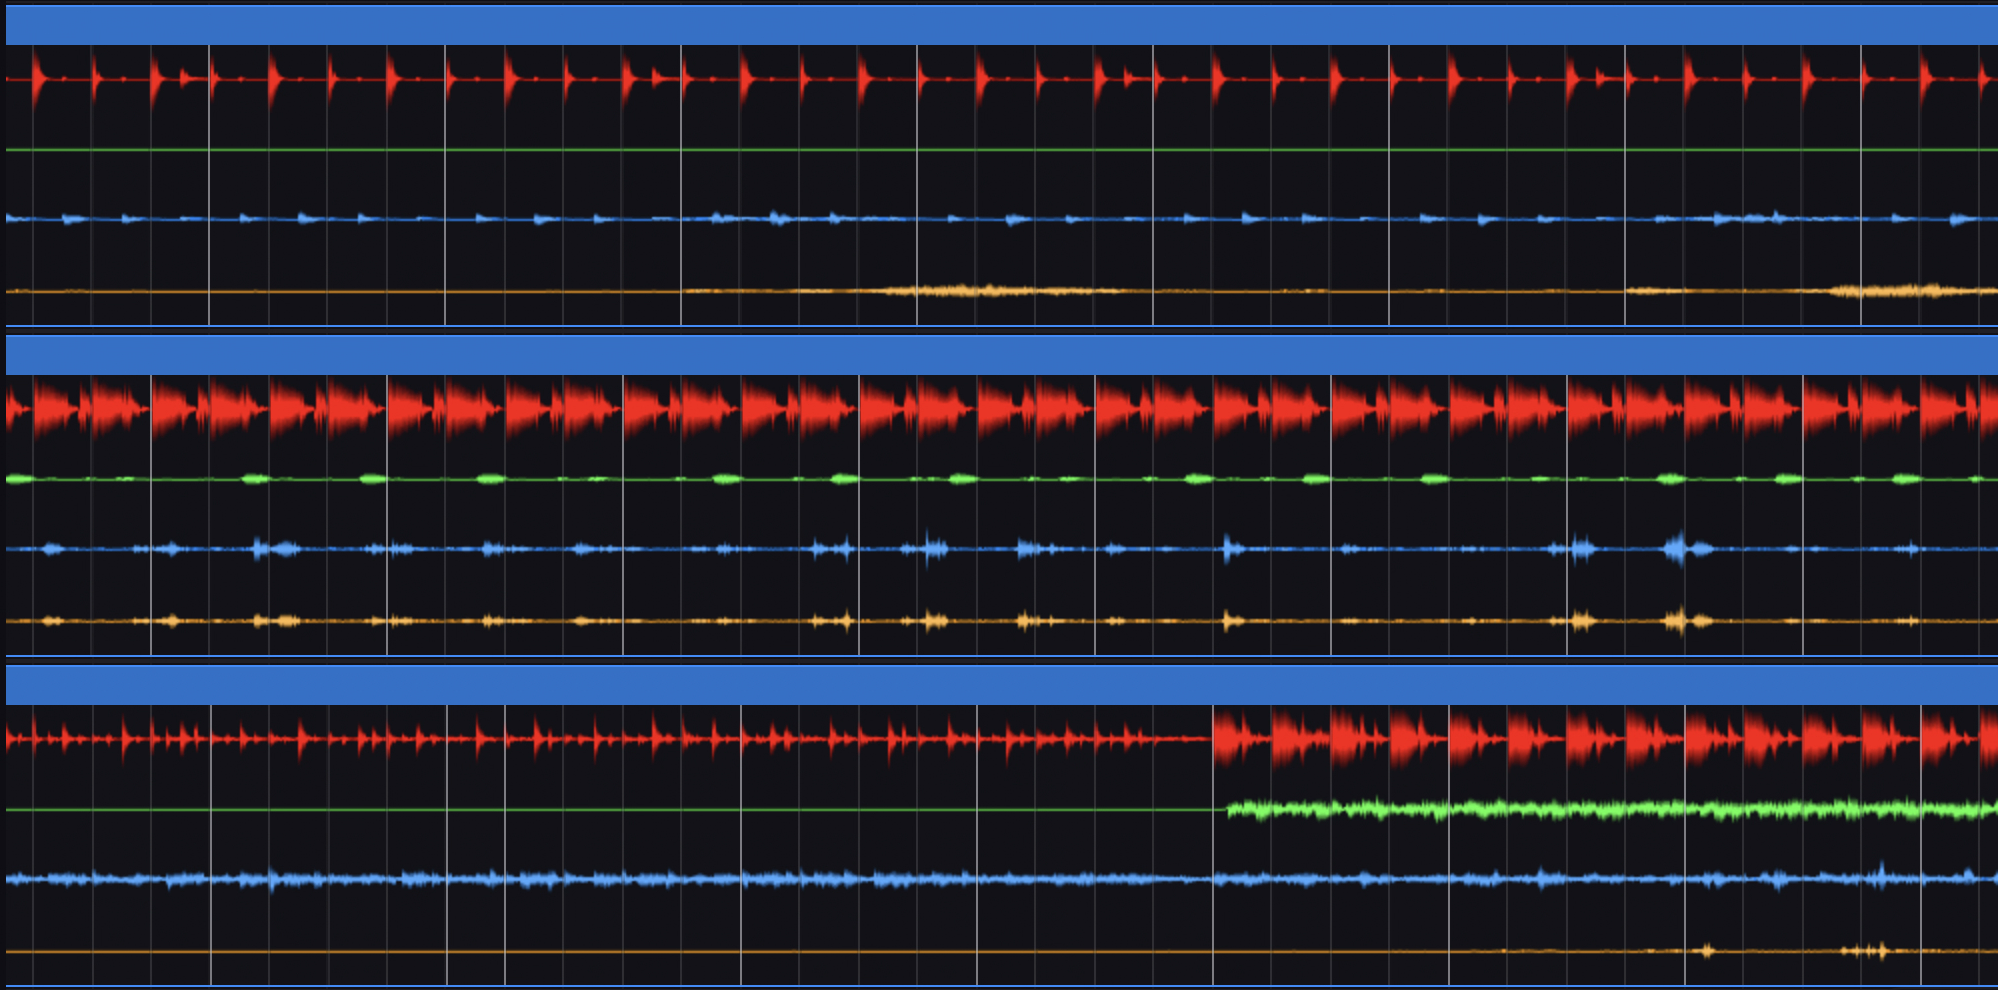
Timeline-Based Mixing
The timeline is the heart of Kuartz. Unlike traditional DJ software with two decks, you work on a visual timeline where you can see your entire set, plan transitions in advance, and make adjustments on the fly. Think of it like a DAW for DJing.
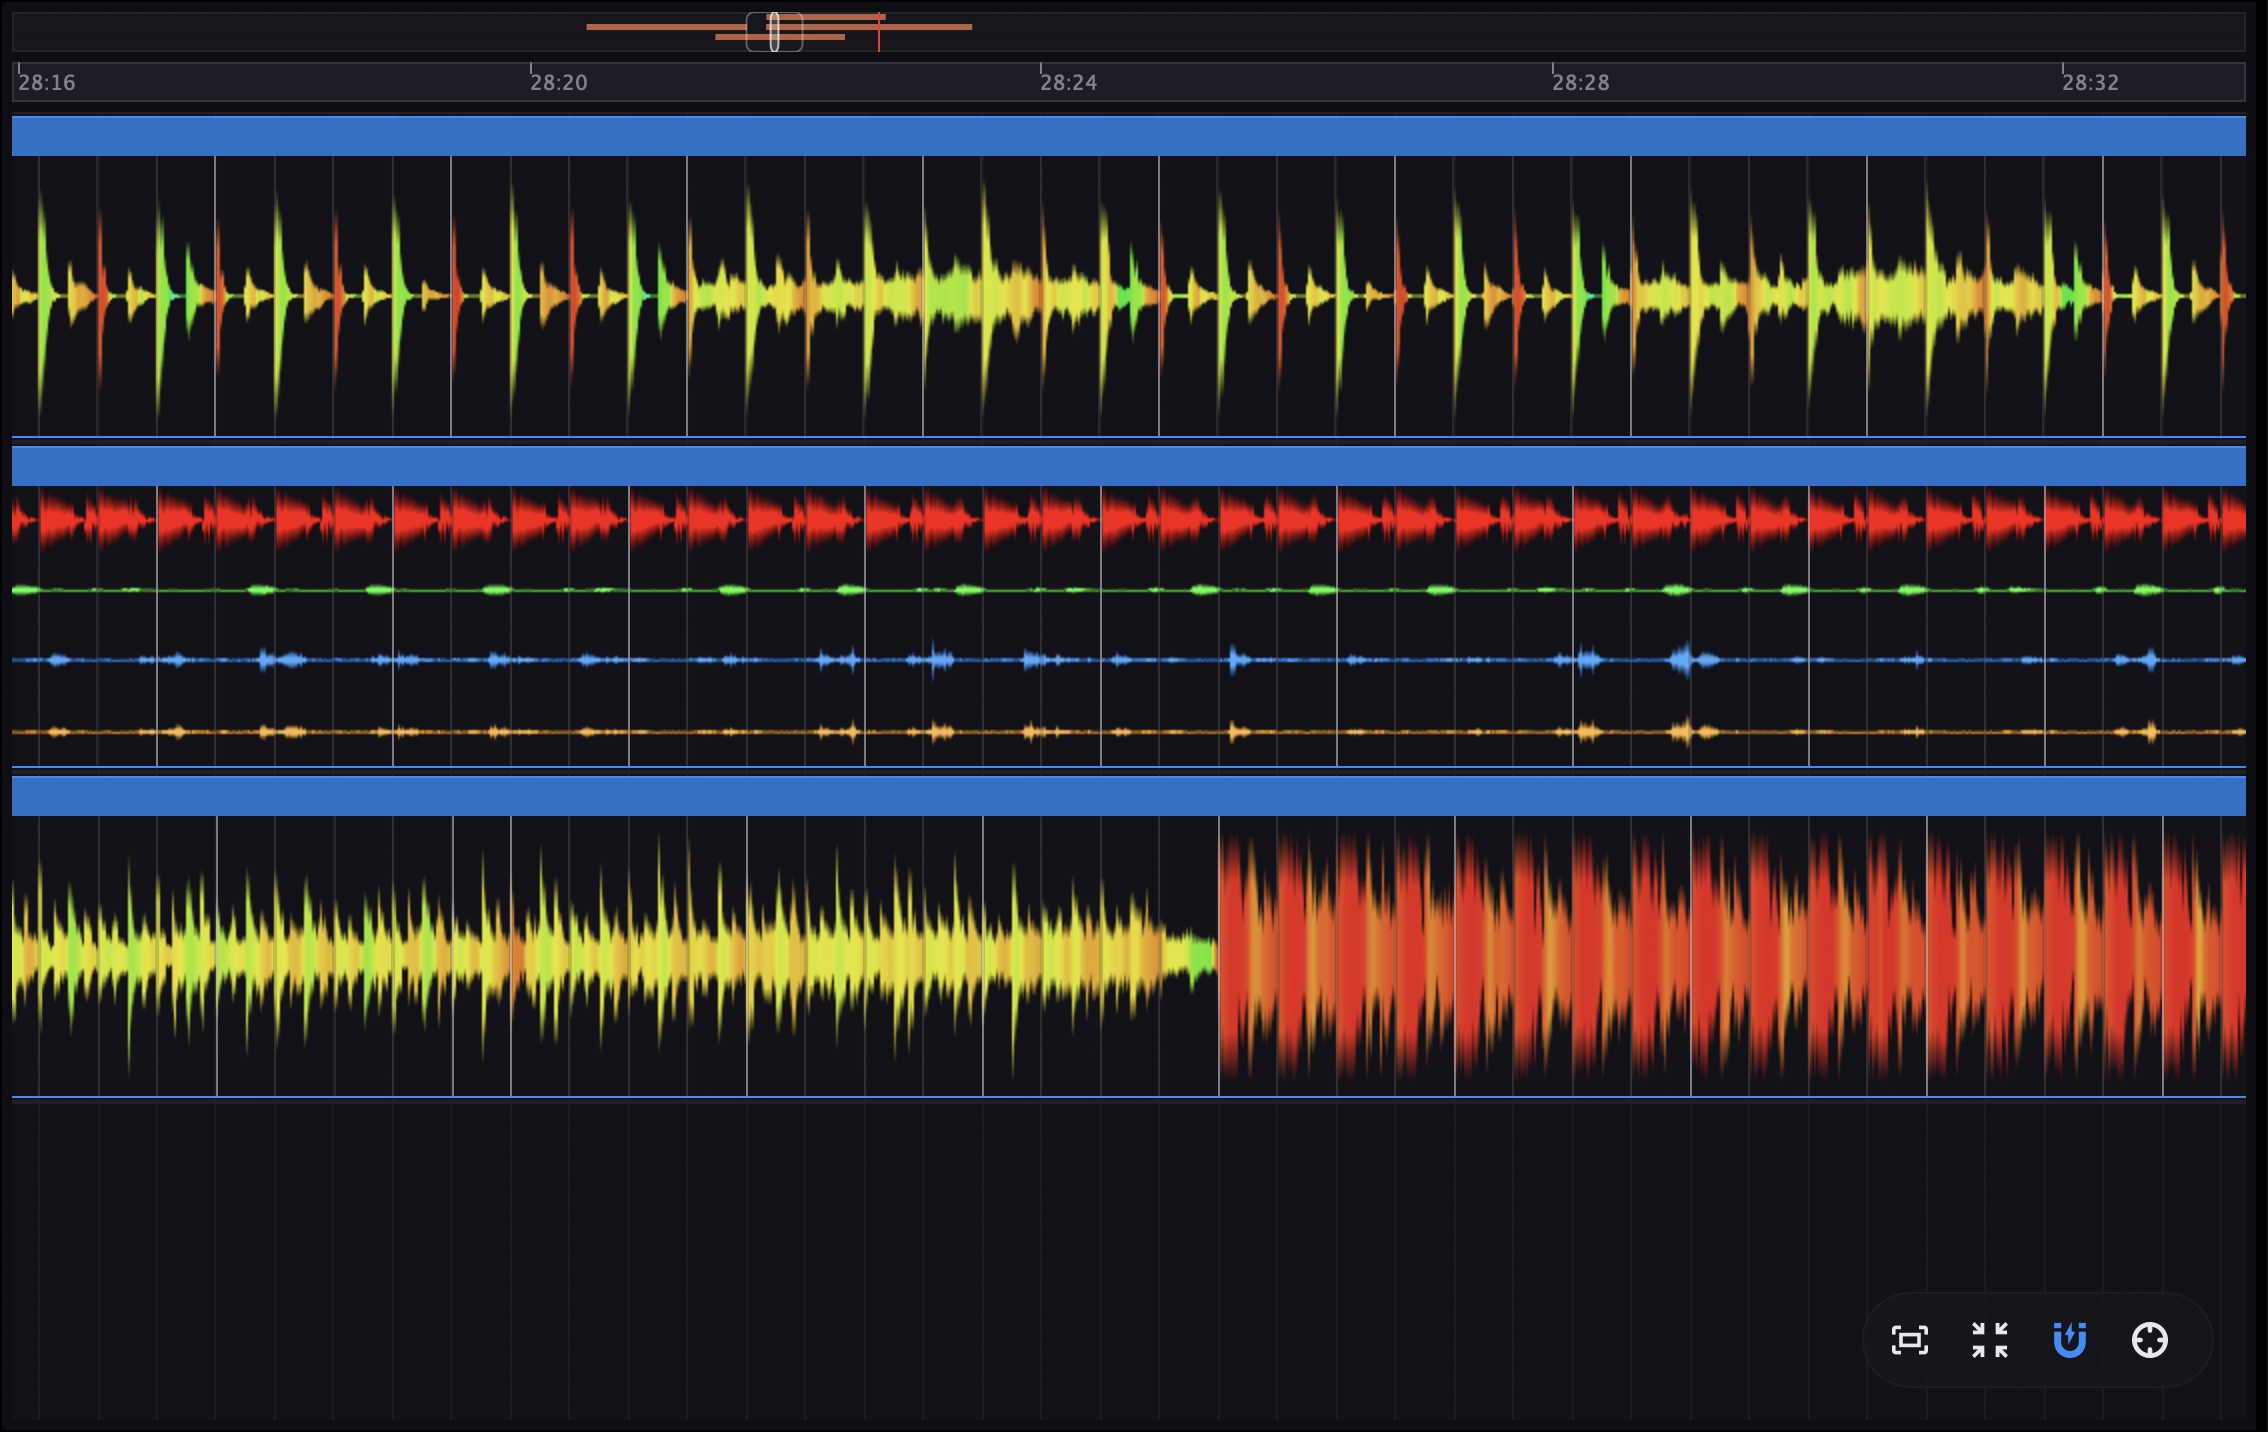
Understanding the Timeline
The timeline displays 4 horizontal tracks (decks), each capable of holding audio clips. Time flows from left to right, and the vertical playhead shows the current playback position. When two clips overlap horizontally, both play simultaneously - this is where your transitions happen.
Timeline Elements
- • Beat Grid - Vertical lines showing beats and bars for alignment
- • Playhead - The vertical line indicating current position
- • Clips - Audio regions showing waveforms
- • Track Controls - Mixer strip on the left of each track
Zoom Levels
The grid adapts to your zoom level:
- • Zoomed in: See individual beats
- • Medium zoom: See 4-8 beat groupings
- • Zoomed out: See 16-128 beat sections
Use pinch gestures or scroll to zoom.
Navigation
| Action | Result |
|---|---|
| Scroll wheel (vertical) | Navigate between tracks vertically |
| Scroll wheel (horizontal) | Pan through the timeline |
| Pinch gesture (trackpad) | Zoom in/out horizontally |
| Magnify gesture | Zoom centered on cursor position |
| Click on empty area | Move playhead to that position |
Working with Clips
Clips are the audio regions on your timeline. Each clip represents a track from your library. You can move, trim, copy, and manipulate clips to build your set.
Clip Actions
- • Click - Select the clip (shows blue border)
- • Double-click - Open in Clip Editor for detailed editing
- • Drag center - Move the clip to a new position
- • Drag left edge - Trim the start point
- • Drag right edge - Trim the end point
- • Right-click - Open context menu with more options
Context Menu Options
- • Switch to Stems - Play separated stems instead of original
- • Extract Stems and Switch - Process stems and switch immediately
- • Switch to Original - Return to full audio
- • Mix Recommendations - Get AI suggestions for next track
- • Load in Clip Editor - Open detailed editor panel
- • Delete Clip - Remove from timeline
Loop Control
Loops let you repeat a section of a track indefinitely. This is essential for extending breakdowns, building tension, or holding a groove while you prepare the next track. The loop stays perfectly in sync with the global BPM.
Available Loop Sizes (in beats)
Most common sizes highlighted. 4 beats = 1 bar in 4/4 time.
Loop Toggle
Click the loop button (●) to activate/deactivate the loop at current position.
Size Controls
Use ×2 to double loop size or ÷2 to halve it while looping.
Quick Select
Click the beat button to show overlay and select specific loop size.
Clip Editor
The Clip Editor gives you detailed control over individual tracks. Set cue points, adjust BPM, change the key, and fine-tune gain settings. Open it by double-clicking any clip on the timeline.
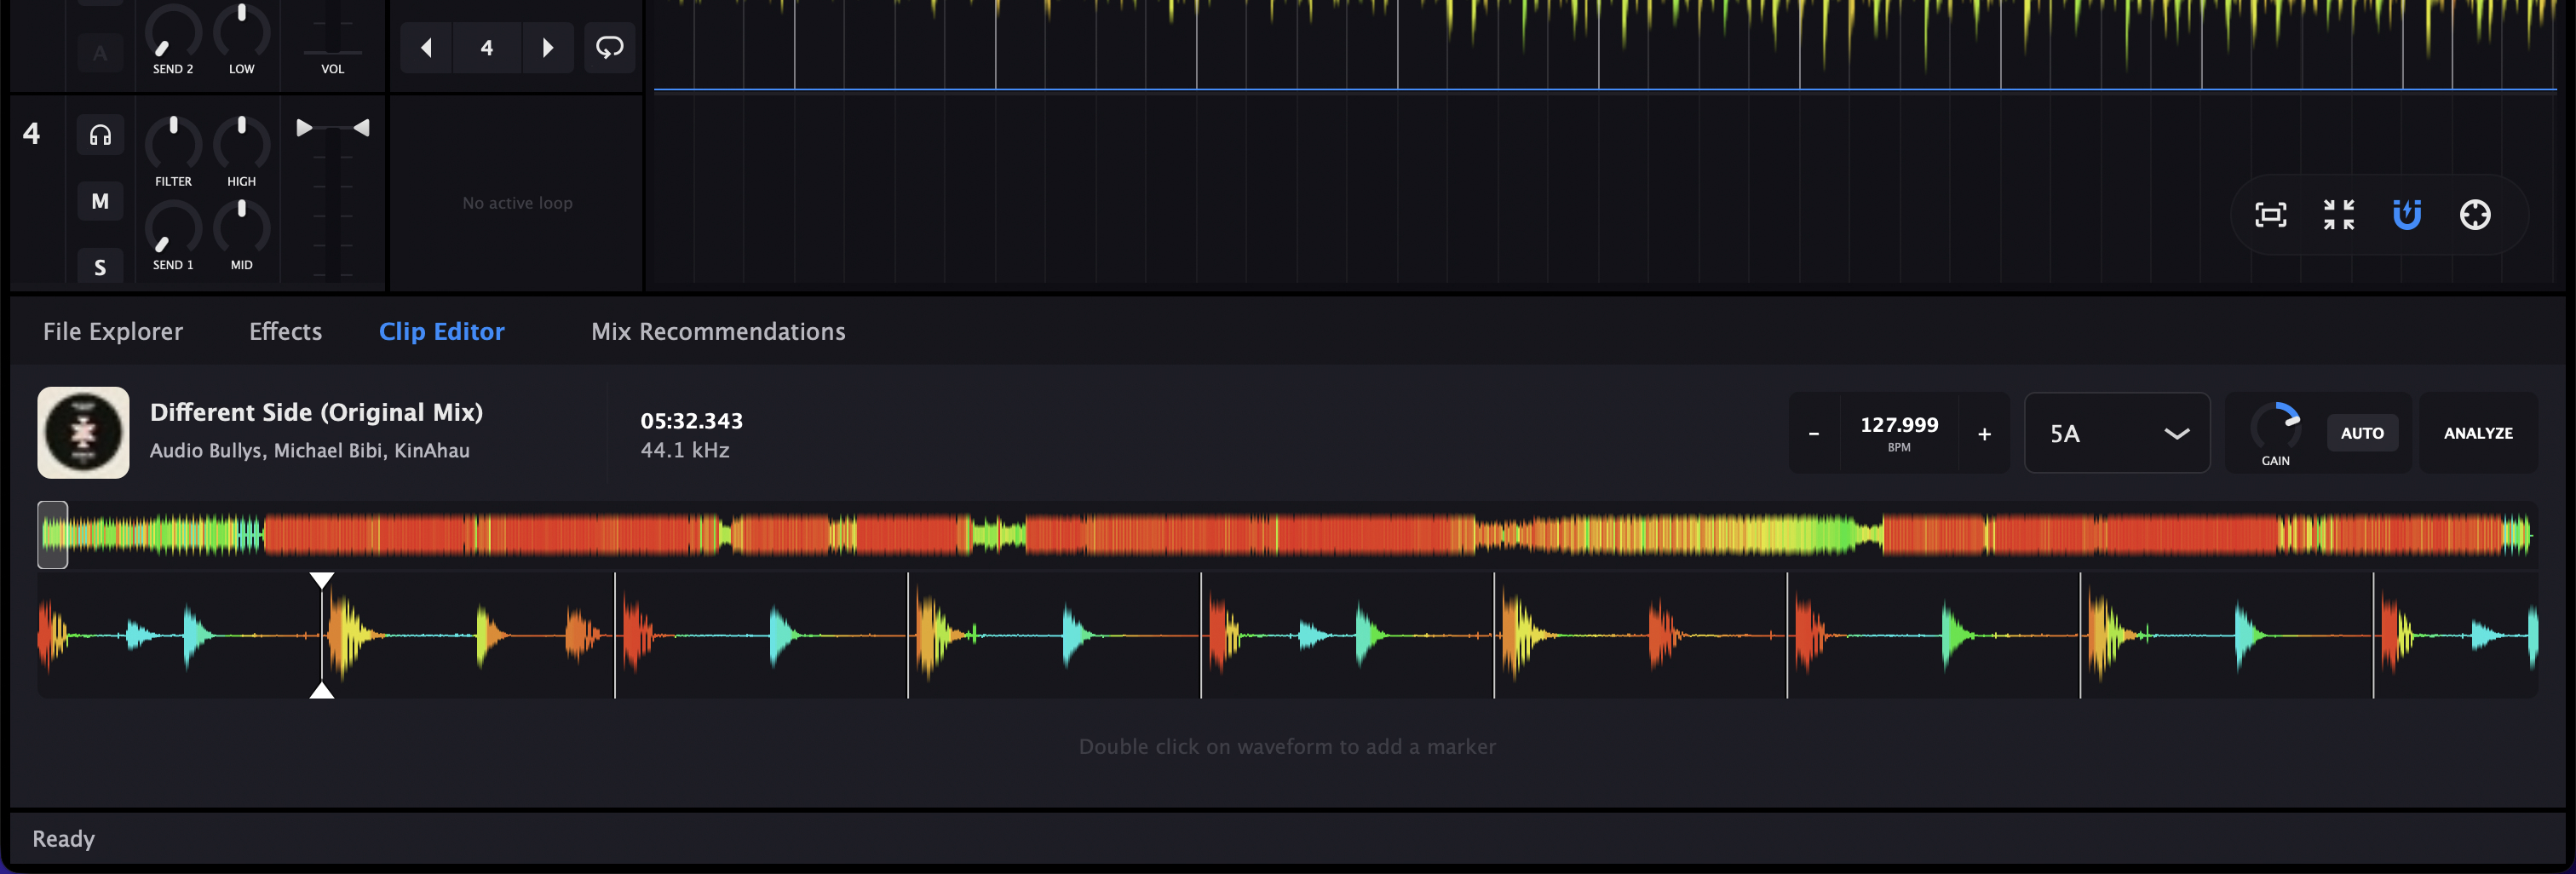
Track Information
The top of the Clip Editor shows essential information about the loaded track.
Track Header
- • Cover Art - Album artwork (54x54 pixels)
- • Title - Track name from metadata
- • Artist - Artist name
- • Album - Album name
File Information
- • Filename - Original file name
- • Duration - Track length (HH:MM:SS.MMM)
- • Sample Rate - Audio quality in Hz
BPM & Key Controls
Clip BPM (20-300)
The detected BPM of the original track. You can manually adjust this if the detection was incorrect.
- • Click value to type directly
- • Drag vertically for continuous adjustment
- • Use +/- buttons for fine control (auto-repeat when held)
Note: If the detected BPM is half or double the actual tempo, adjust it here. The track will then sync correctly with your global BPM.
Musical Key
The detected musical key of the track. Displayed in Camelot notation for easy harmonic mixing.
- • Select from dropdown (12 keys available)
- • Color-coded for Camelot wheel compatibility
- • Used by AI recommendations for harmonic mixing
Gain & Analysis
Gain Knob
Adjust the clip's volume level. Use this to match loudness between tracks so transitions are smooth without sudden volume changes.
AUTO (Normalize)
Toggle automatic gain normalization. When enabled, Kuartz automatically adjusts the gain to match other tracks in your set.
Reanalyze
Re-run the analysis to detect BPM, key, and energy. Useful if you've modified the track or if initial detection was inaccurate.
Cue Points & Markers
Markers help you navigate within a track and identify important sections like drops, breakdowns, or vocal entries.
Marker Types
- ● IN - Start point for the clip
- ● OUT - End point for the clip
- ● Normal - General cue points for navigation
Marker Actions
- • Click badge - Jump to marker position
- • Click menu (⋮) - Rename, change color, change type, or delete
Waveform Display
The waveform shows the audio visually, making it easy to identify beats, drops, and quiet sections.
Navigation
- • Scroll wheel to zoom in/out
- • Click and drag to pan
- • Click on waveform to set playhead position
Minimap
The minimap at the top shows an overview of the entire track. The highlighted area indicates what's currently visible in the main waveform view. Click on the minimap to quickly navigate to any part of the track.
Track Controls
Each of the 4 decks has a full channel strip with professional mixing controls. The mixer is displayed vertically on the left side of each track in the timeline, giving you immediate access to EQ, filter, volume, and routing controls.
Channel Controls
Each channel has routing buttons that control where the audio goes. Click on a track's number to focus it (shown with blue border), which selects that deck for any focused operations.
Mute
Completely silences this track in the master output. The track keeps playing but you won't hear it.
Solo
Hear only this track - all other non-soloed tracks are muted. Multiple tracks can be soloed.
Preview (Cue)
Sends this track to the Preview output (headphones). Independent of Mute/Solo - you can preview a muted track!
Automation
Reserved for future automation features. Currently disabled.
Filter (Xone-Style)
The filter is modeled after the legendary Allen & Heath Xone:92 filter, known for its smooth, musical sweeps. It's a single knob that transitions between highpass and lowpass filtering with a bypass point in the center - perfect for building tension or creating dramatic sweeps during transitions.
Highpass (Left)
Removes bass and low-mids. Turn fully left for maximum HP effect (100%).
Center (Bypass)
No filtering applied. This is the default position for normal playback.
Lowpass (Right)
Removes highs and presence. Turn fully right for maximum LP effect (100%).
Transition Technique
For smooth transitions, try sweeping the outgoing track's filter toward highpass while sweeping the incoming track from lowpass toward center. This creates a natural crossover effect where frequencies "hand off" from one track to another.
3-Band EQ
A professional 3-band equalizer with isolator-style "kill" capability. Each band ranges from -50dB (complete cut) to +6dB boost. The curve uses logarithmic scaling for precise control in the cut range, and at the minimum position, the band is completely silenced (cut-to-infinity).
HIGH
Controls treble, cymbals, hi-hats, and vocal sibilance. Cut the highs during transitions to reduce harshness.
MID
Controls vocals, synths, and melodic content. Cutting mids can help two tracks blend without clashing melodies.
LOW
Controls kick drums and bass. Essential for the "bass swap" technique - never have two bass lines at full volume together!
Tip: Double-click any EQ knob to instantly reset to 0dB (unity).
Note: The knob arc starts from center (0dB), making it easy to see if you're boosting or cutting.
Volume & Sends
Volume Fader
- • Range: -50dB to 0dB with cut-to-infinity
- • Drag the triangle markers to adjust
- • Double-click to reset to 0dB
- • VU meter shows real-time L/R levels
Send Controls
- • SEND 1 - Route to FX bus 1 (0-100%)
- • SEND 2 - Route to FX bus 2 (0-100%)
Effects & VST Plugins
Add depth and creativity to your mixes with built-in effects or your favorite VST/AU plugins. Effects can be applied to the master output, send buses, or external routing for maximum flexibility.
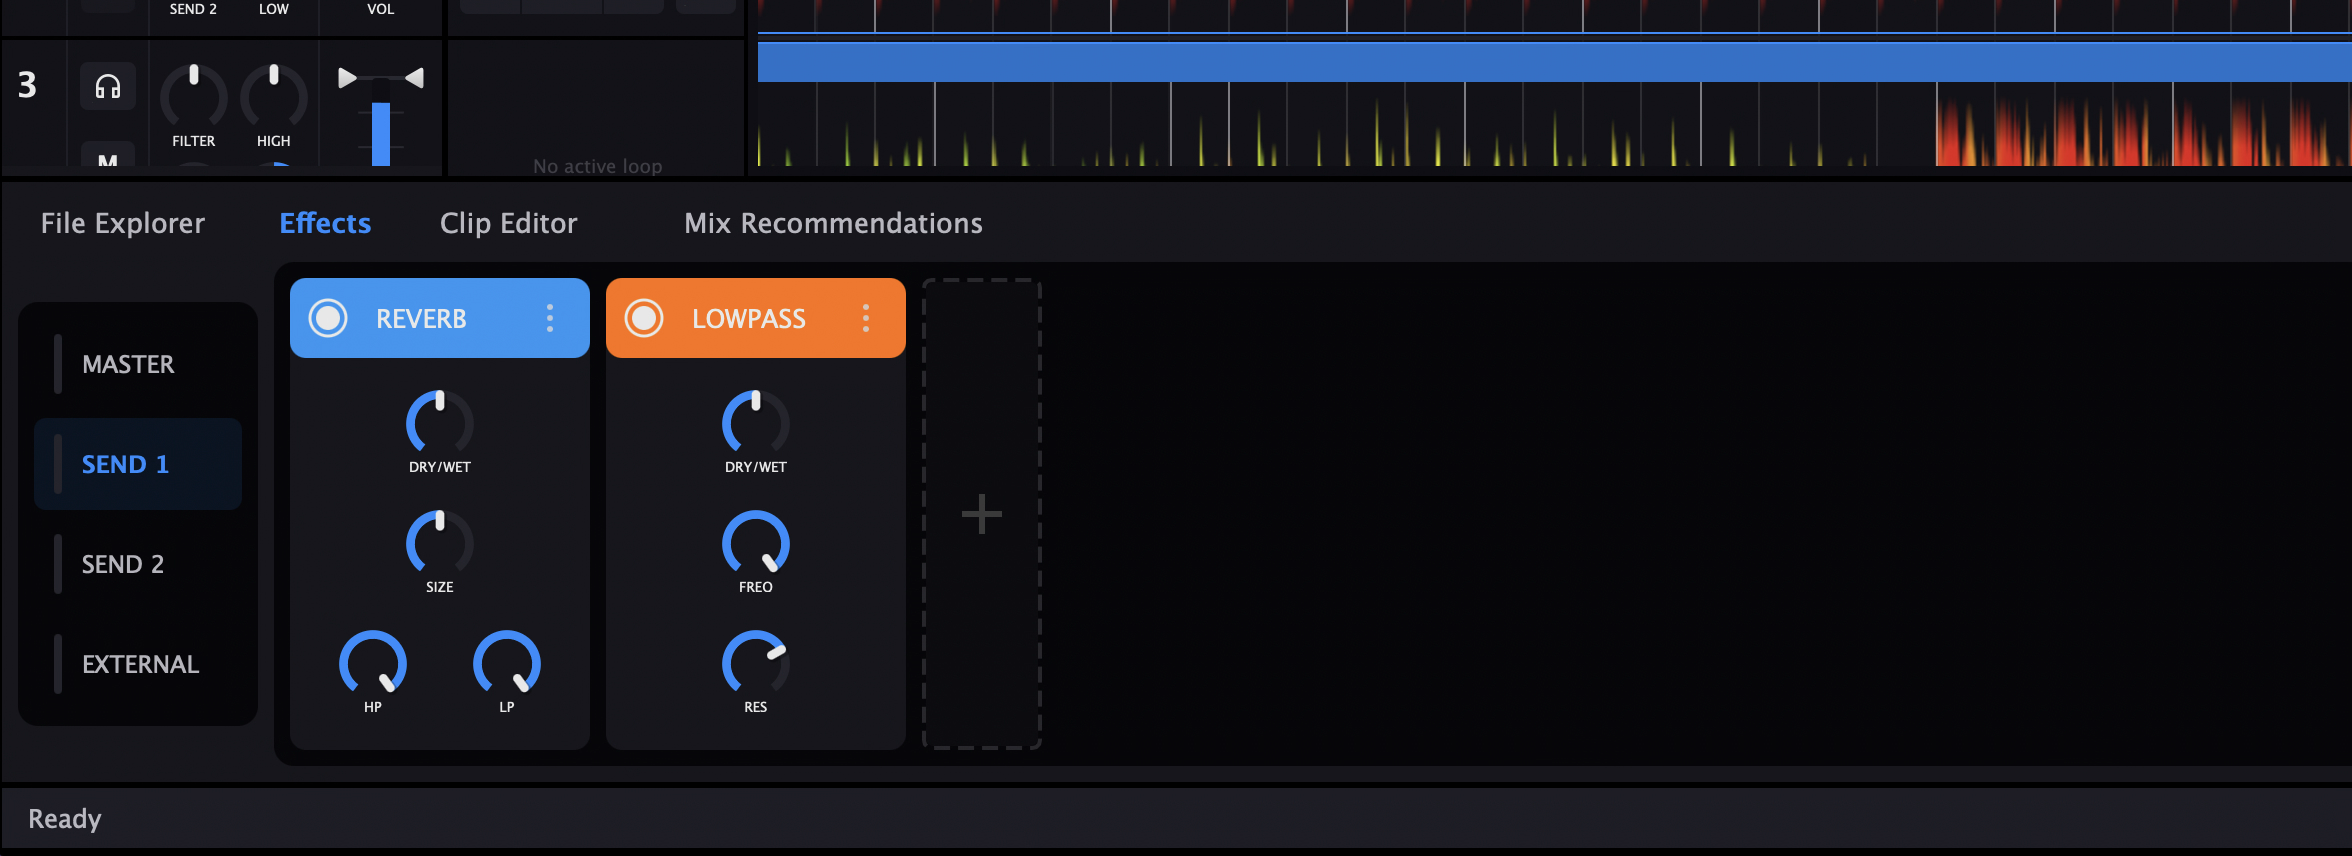
Effect Racks
Effects are organized into racks. Each rack processes audio from a specific bus. Click on a rack selector button to switch between them - each button shows a real-time VU meter indicating the audio level on that bus.
MASTER
Effects applied to the final mix output. Use for mastering effects like limiters or subtle compression.
SEND 1
Shared effects bus. Use the SEND 1 knob on each channel to control how much signal goes here.
SEND 2
Second shared effects bus. Great for having reverb on SEND 1 and delay on SEND 2.
EXTERNAL
Effects for external routing mode. Processes audio going to separate physical outputs.
Send Effects vs Insert Effects
Send effects (SEND 1/2) are shared - multiple tracks can use the same reverb, saving CPU. Insert effects (MASTER) process the entire signal. For per-track effects, use the channel filter/EQ or add effects to the master with careful gain staging.
Built-in Effects
Kuartz includes essential DJ effects, optimized for low latency and high quality.
Reverb
Adds space and depth. Great for vocal atmospheres and transition effects.
Delay
Echo effect synced to BPM. Creates rhythmic patterns and builds tension.
LowPass
Cuts high frequencies. Useful for creating underwater or muffled effects.
HighPass
Cuts low frequencies. Creates thin, telephone-like sounds for buildups.
DropMaximizer
Loudness maximizer designed for drops. Adds punch and presence.
Effect Controls
Each effect slot displays its controls in a consistent layout. Effects can be chained (processed in order) and reordered by dragging.
Per Effect Slot
- • Bypass (●) - Green when active, toggles the effect. Use to A/B compare.
- • Effect Name - Shows which effect is loaded
- • Menu (⋮) - Remove effect from rack
- • Parameter Knobs - Adjust dry/wet, time, feedback, etc.
Rack Management
- • Drag effect slots - Reorder the processing chain
- • Click + button - Add new effect from menu
- • Up to 10 effects - Per rack maximum
VST & AU Plugin Support
Use your favorite studio plugins live in your DJ sets. Kuartz supports AU (macOS) and VST3 (64-bit) plugins, so any effect that works in your DAW will work here.
Supported Formats
- • AU (Audio Unit) - macOS
- • VST3 (64-bit) - macOS/Windows
Managing Plugins
Go to Settings → VST Plugins to scan for plugins and manage which ones are available in the effect menu.
Performance Note: VST plugins can be CPU-intensive. Monitor the CPU indicator in the top bar. If you experience audio dropouts, try reducing the number of active plugins or increasing buffer size.
App Store Version: If you downloaded Kuartz from the Mac App Store, some VST/AU plugins may not work due to macOS sandbox restrictions. Many plugins require system access that the sandbox blocks. For full plugin compatibility, download the direct version from our website.
Stem Separation
Isolate vocals, drums, bass, and other elements from any track.
4 Stem Tracks
Drums
Kicks, snares, hi-hats, percussion
Bass
Bass lines and low frequencies
Vocals
Voices and vocal harmonies
Other
Melodies, synths, other elements
Extracting Stems
- 1. Right-click on a track in your library or timeline
- 2. Select "Extract Stems" or "Extract Stems and Switch"
- 3. Wait for AI processing to complete
- 4. Use mute buttons and volume sliders to control each stem
Creative Uses
Smooth Transitions
Drop drums from one track while bringing in drums from another.
Live Mashups
Layer vocals from one track over the instrumental of another.
Energy Control
Remove elements to build tension, bring them back for impact.
System Requirements: Stem separation is CPU and memory intensive. We recommend at least 24GB RAM and closing other applications before processing. Stop playback before extracting stems for best performance.
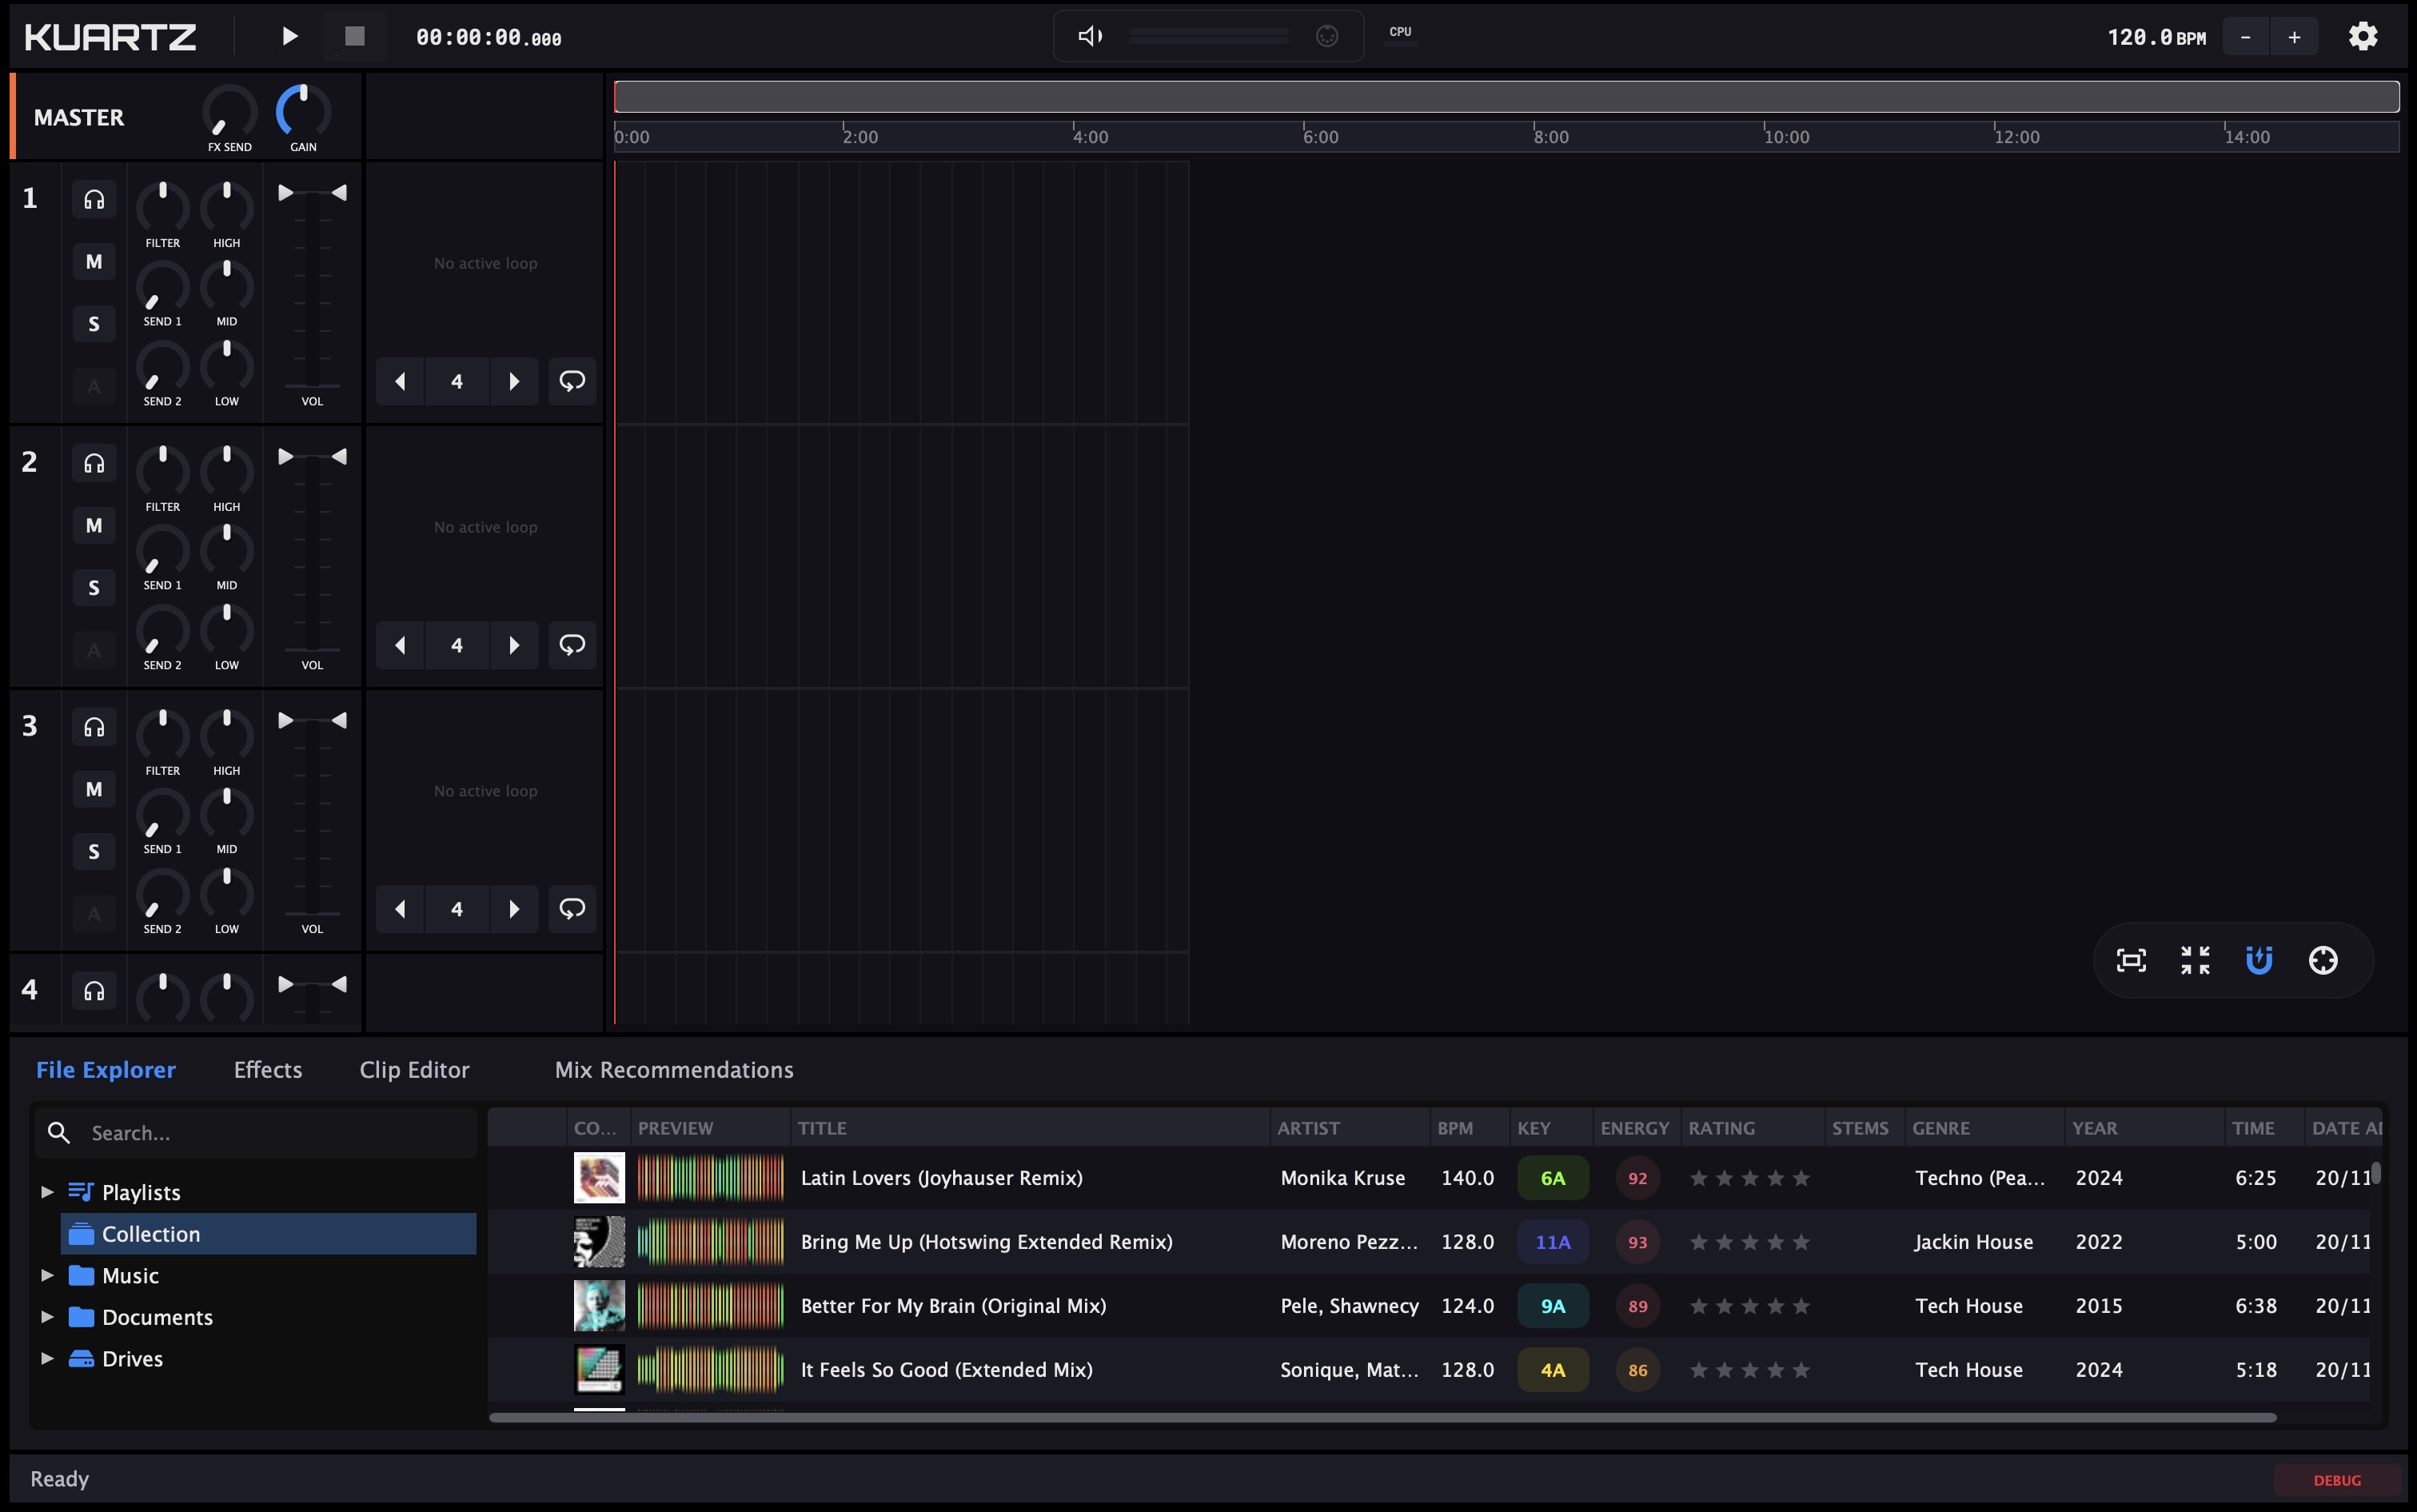
File Browser
Browse, search, and organize your music collection.
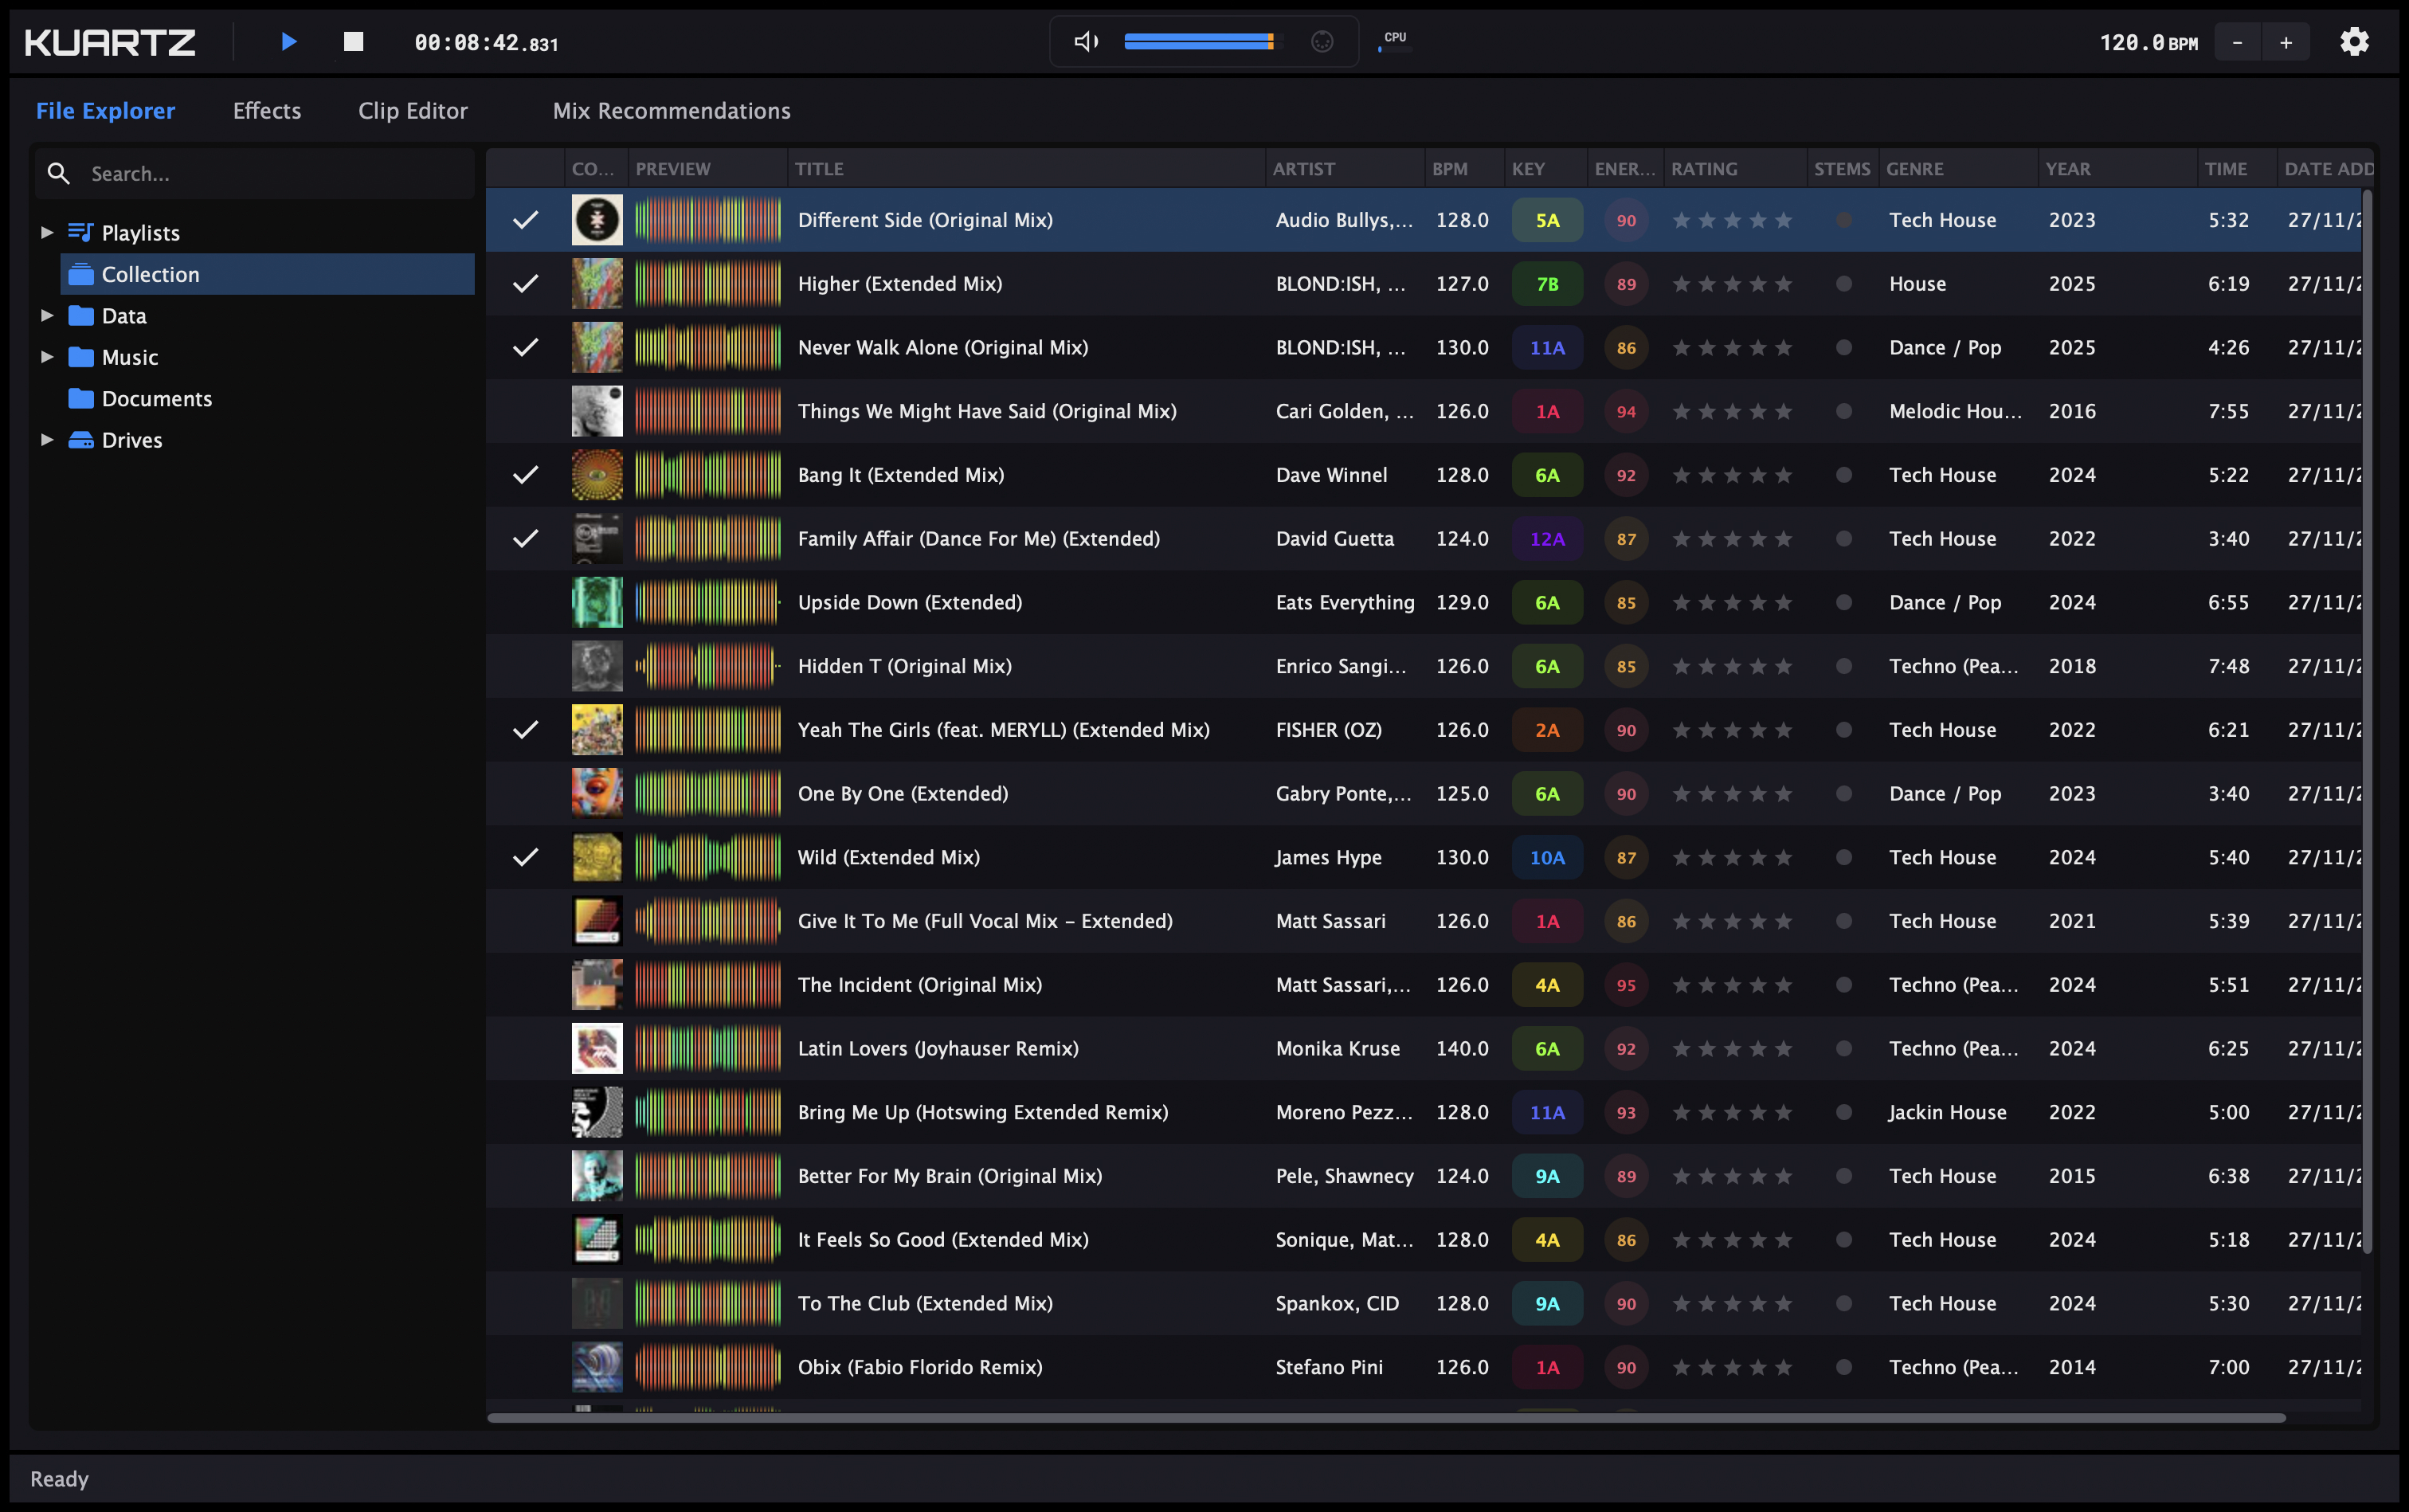
Navigation
Quick Access
- Playlists - Your custom playlists
- Collection - All imported tracks
- Home - User folder
- Music - Music folder
- Drives - External drives
Search
Use the search box to find tracks by title, artist, album, or any metadata.
Track Information
Sortable columns help you find the perfect track.
| Column | Description |
|---|---|
| Cover | Album artwork |
| Title / Artist | Track name and artist |
| BPM | Detected tempo |
| Key | Musical key (Camelot notation with color) |
| Energy | Energy level 0-100 (color-coded) |
| Rating | Your 1-5 star rating |
| Genre / Year | Metadata from file |
| Status | Analysis progress indicator |
Working with Tracks
Actions
- • Click - Select track
- • Double-click - Open context menu
- • Drag - Add to timeline
- • Click stars - Set rating
Context Menu
- • Get Recommendations
- • Open in Clip Editor
- • Analyze / Extract Stems
- • Add to Playlist
Playlists
Organize your tracks into custom playlists for easy access and set preparation.
Managing Playlists
- • Right-click Playlists - Create new playlist
- • Right-click playlist - Rename or delete
- • Add to Playlist - Use context menu on any track
Reordering Tracks
- • Cmd/Ctrl + Drag - Reorder tracks within playlist
- • Drag without modifier - Add tracks to timeline
Tip: Hold Cmd (Mac) or Ctrl (Windows) while dragging to reorder tracks within a playlist instead of adding them to the timeline.
Mix Recommendations
Stop scrolling through thousands of tracks. Kuartz AI analyzes BPM, key, energy, and musical characteristics to suggest tracks that will actually work next in your mix.
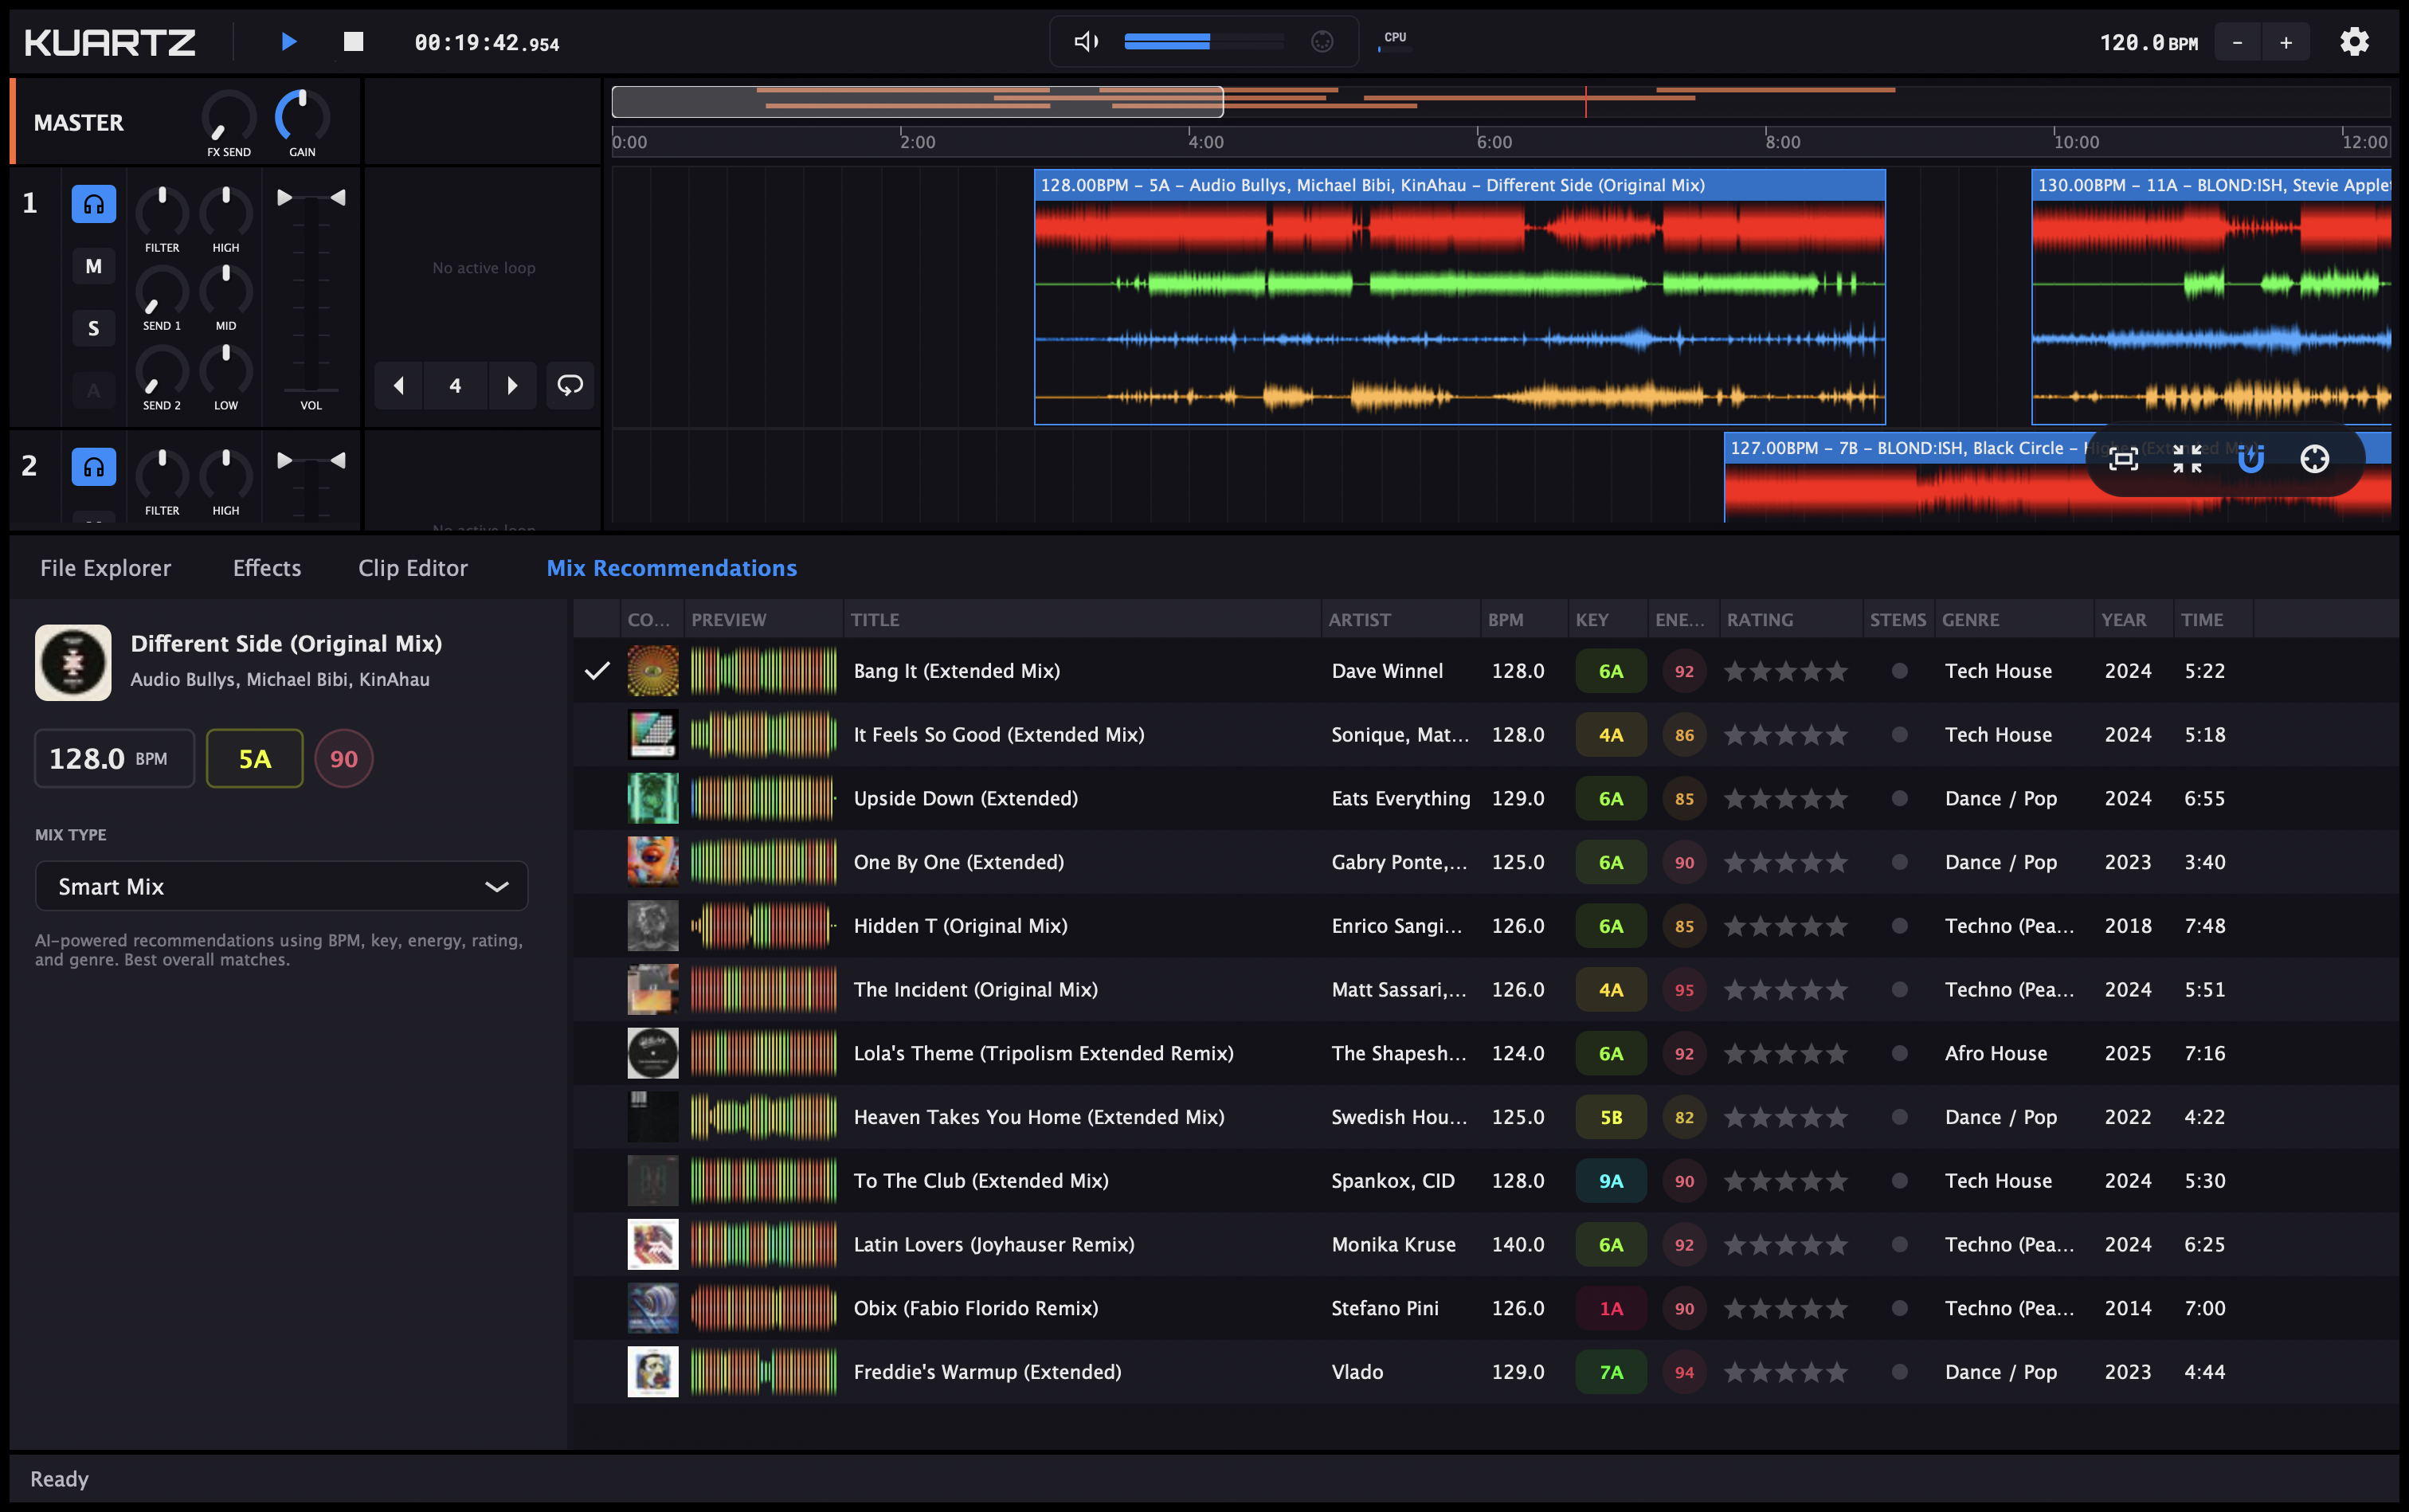
How It Works
The recommendation engine considers multiple factors to find tracks that will mix well together:
BPM Compatibility
Finds tracks within a mixable tempo range to avoid extreme time-stretching.
Harmonic Matching
Uses the Camelot wheel to find tracks in compatible musical keys.
Energy Level
Considers track intensity (0-100) to control your set's energy flow.
Smart Analysis
AI combines all factors to rank the best overall matches.
Mix Directions
Choose how you want to shape your set's energy. Each direction filters recommendations differently.
Energy Match
Keep the vibe steady. Finds tracks with similar energy to your current one.
Energy Boost
Build the energy up. Shows tracks with higher intensity for peak moments.
Energy Drop
Bring it down. Perfect for breaks, cooldowns, or transitioning to chill sections.
Harmonic Mix
Key-focused. Prioritizes Camelot wheel compatible keys for melodic blending.
Smart Mix
AI's best picks. Balances all factors for the most natural transitions.
Getting Recommendations
Step by Step
- 1. Right-click a track in the browser or timeline
- 2. Select "Mix Recommendations" or "Get Recommendations"
- 3. Choose your desired mix direction
- 4. Browse the recommended tracks with BPM, key, and energy info
- 5. Drag your chosen track directly to the timeline
Recommendations Panel
The panel shows your reference track at the top with its key info (cover, title, BPM, key, energy), followed by a table of recommended tracks.
Each recommendation shows how well it matches based on your selected direction. You can preview tracks before adding them to your timeline.
Tips for Better Recommendations
- • Ensure your tracks are fully analyzed (BPM, key, energy) for accurate recommendations
- • The larger your analyzed library, the better the recommendations
- • Use Harmonic Mix for melodic tracks and Smart Mix for rhythmic/percussive genres
Audio Analysis
Kuartz automatically analyzes your tracks to detect BPM, musical key, and energy level. This information powers the sync engine, harmonic mixing, and AI recommendations.
Supported Audio Formats
Import your music in any of these industry-standard formats:
Lossless
Lossless
Lossless
Compressed
AAC
Vorbis
Recommendation: For best audio quality, use lossless formats (WAV, AIFF, FLAC) especially for professional gigs.
What Gets Analyzed
BPM Detection
Detects the tempo of your track, typically within 0.1 BPM accuracy. This powers the time-stretching engine that keeps all tracks in sync.
Range: 20-300 BPM
Key Detection
Identifies the musical key of the track. Displayed in Camelot notation with color coding for easy harmonic mixing.
12 major + 12 minor keys
Energy Level
Measures the overall intensity and energy of the track on a 0-100 scale. Used by AI recommendations to control your set's flow.
0 (calm) to 100 (intense)
Analysis Status
The Status column in the browser shows the analysis state of each track:
Analyzing
Being processed or in queue
Ready
Analysis complete (no icon)
Played
Track has been loaded
Error
Analysis failed
Manual Analysis Controls
Re-analyze a Track
If BPM or key detection seems wrong, you can re-analyze:
- 1. Right-click the track in browser
- 2. Select "Analyze"
- 3. Or open Clip Editor and click "Reanalyze"
Manual BPM/Key Correction
Sometimes you know better than the algorithm:
- 1. Double-click track to open Clip Editor
- 2. Adjust BPM value (if double/half, fix it)
- 3. Select correct key from dropdown
Keyboard Shortcuts
Transport & Playback
Zoom & Navigation
Clip Selection
Move Selected Clips
Resize Selected Clips
Settings
Settings Tabs
Click the gear icon in the top bar to open Settings. Settings are organized into 7 tabs on the left sidebar:
General
Headroom
Prevents clipping when multiple tracks play simultaneously. Configure separately for Internal Mixing and External Mixing modes.
Time Stretching Quality
Controls the algorithm used to sync tracks to the global BPM while preserving pitch.
| Mode | Description |
|---|---|
| Disabled (Resampler Only) | Pitch changes with tempo. Shows additional Resampler Quality option (Fast, Balanced, High Quality). |
| Fast | Low CPU usage, suitable for live performance. |
| Balanced | Good balance between quality and performance. |
| High Quality | Best audio quality, higher CPU usage. |
Stems Extraction
Enable "Automatically extract stems when analyzing" to process stems for every new track. Disable to extract stems only on demand.
Cache Management
Shows cache size with count of thumbnails and stems. Click "Clear Cache" to delete all cached data (thumbnails and extracted stems).
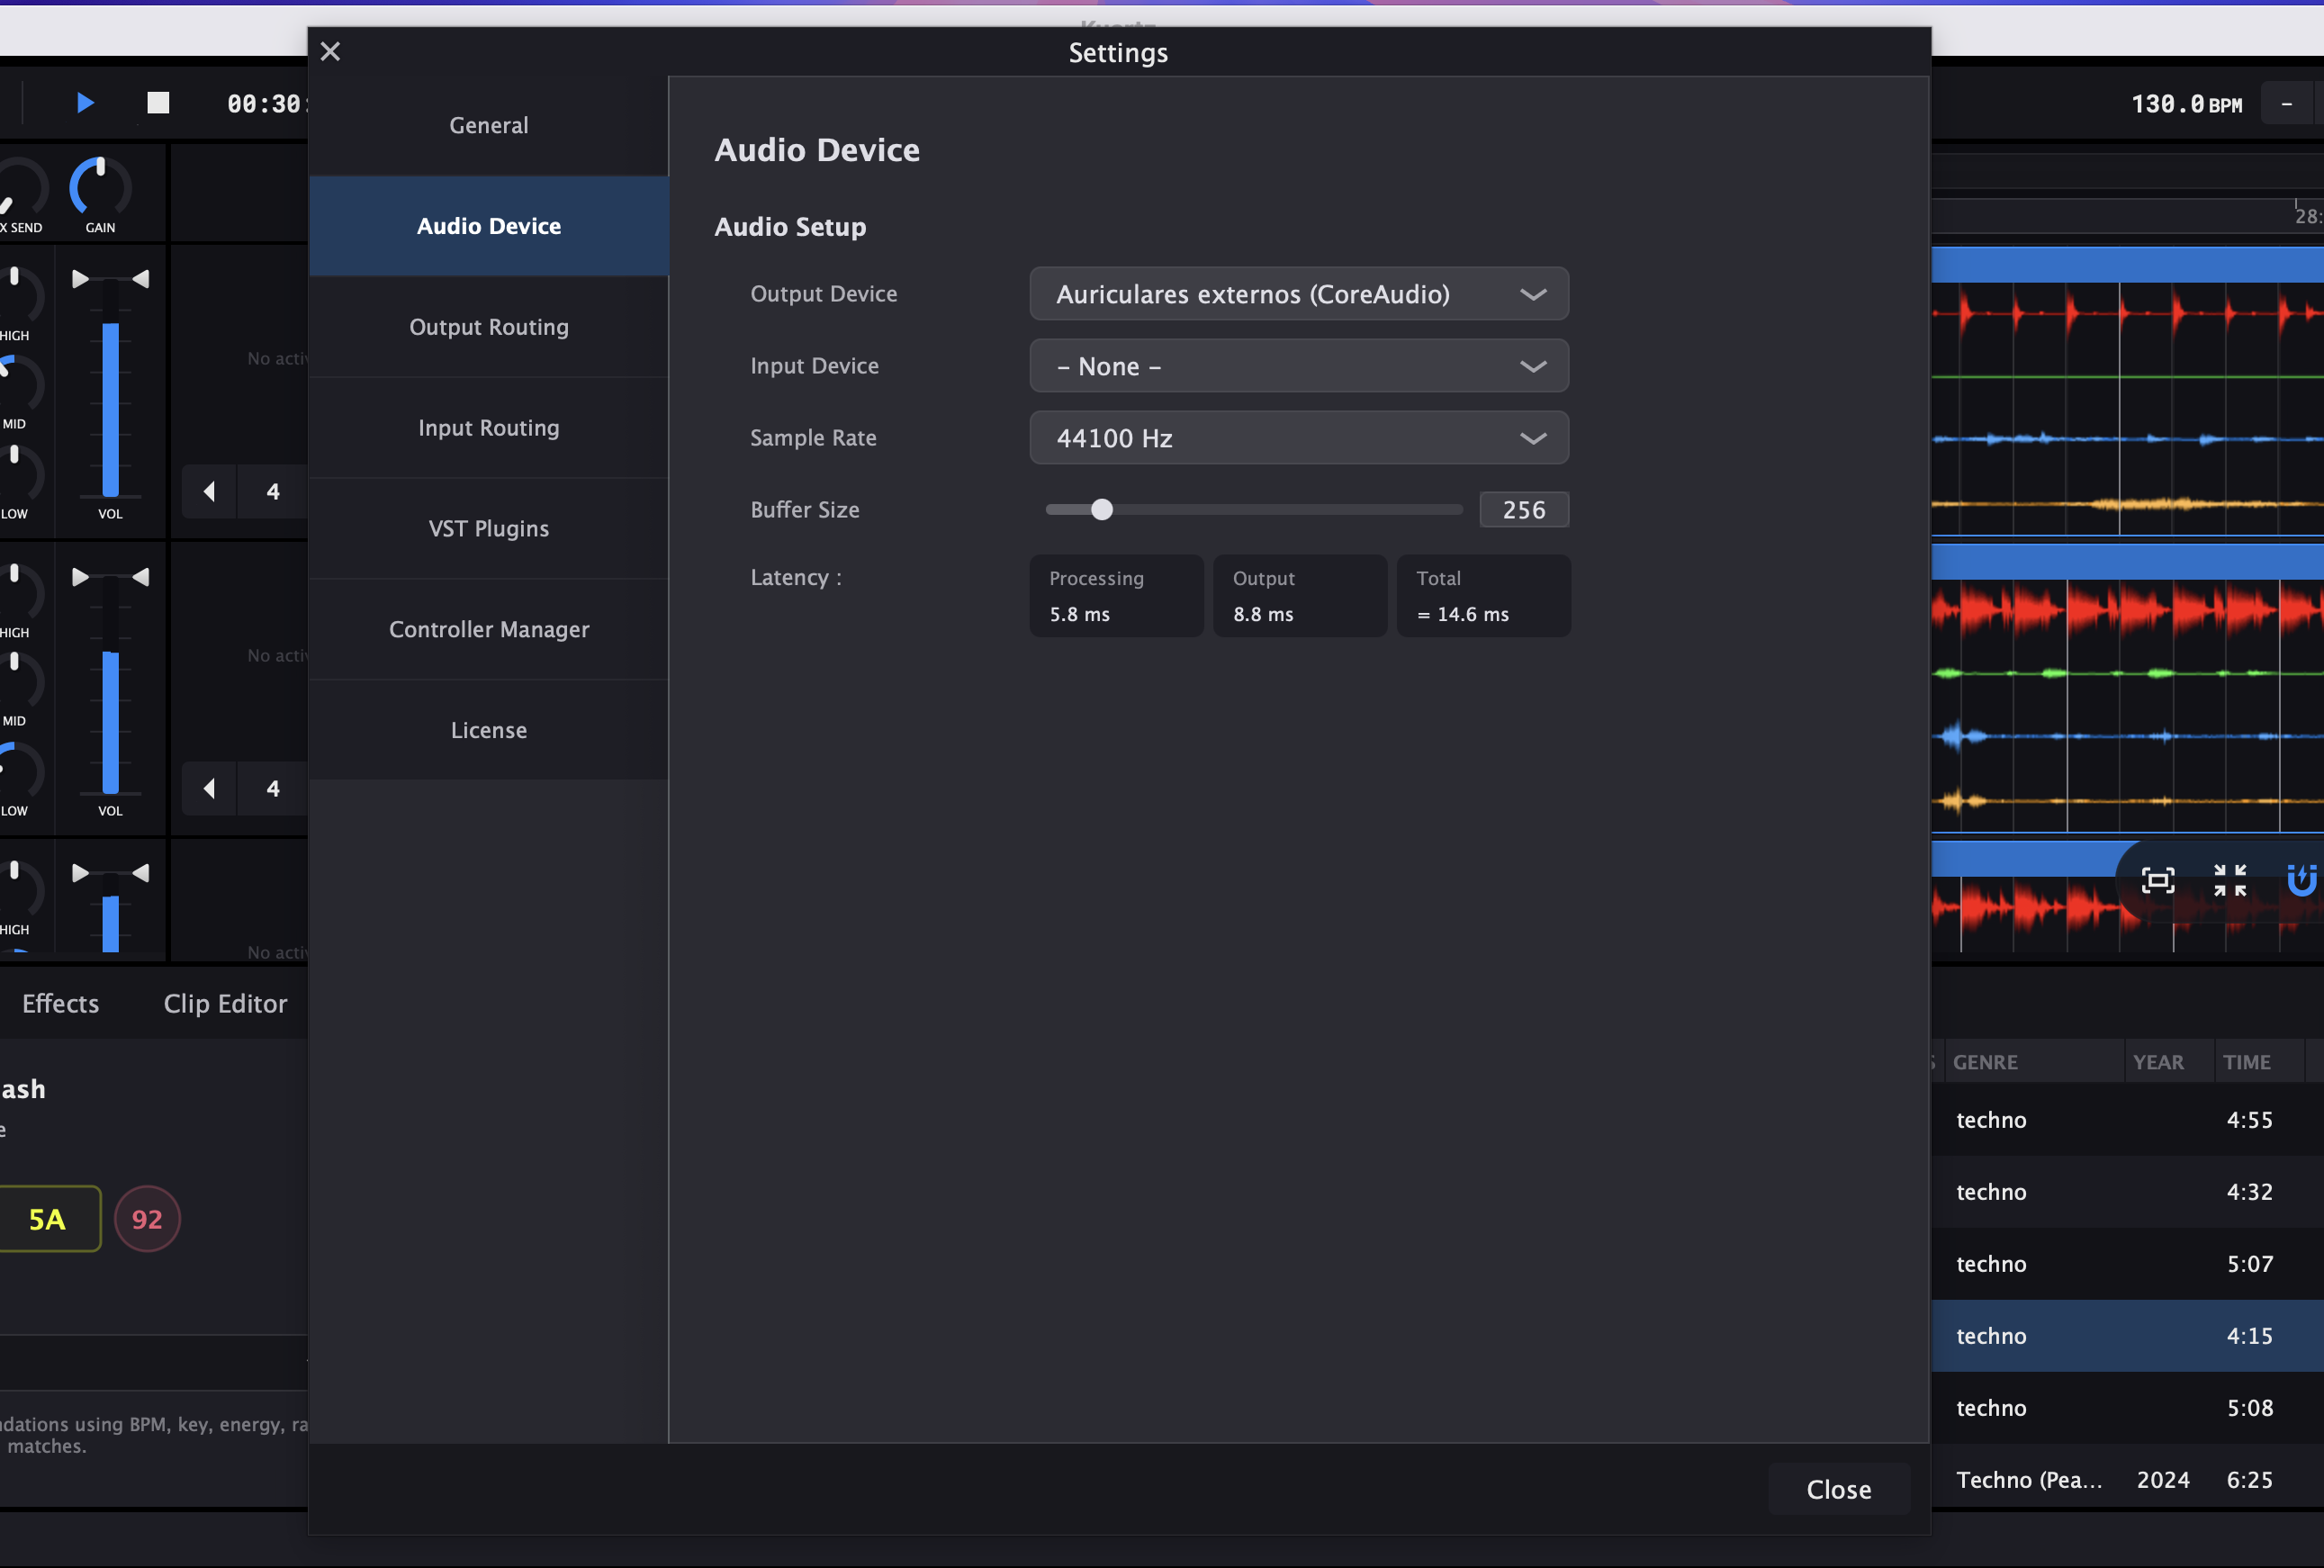
Audio Device
Output Device
Select your audio interface for playback. Shows available devices with their driver type.
Input Device
Select input device for external audio. Can be set to "None" if not needed.
Sample Rate
Select from available sample rates supported by your device (e.g., 44100 Hz, 48000 Hz).
Buffer Size
Slider to select buffer size. Available sizes depend on your audio device.
Latency Display
Shows three latency values: Processing (based on buffer), Output (device latency), and Total latency in milliseconds.
Output Routing
Configure which physical outputs receive each audio bus. Each output has separate L and R channel selectors.
Mixing Mode
Toggle between Internal and External mixing modes:
Internal
All mixing happens inside Kuartz. Configure Master Output, Preview Output, and FX Return Output.
External
Each deck routes to separate outputs for an external mixer. Configure Output Deck 1-4, Output Preview, and Output FX Return.
Master Output
Main mix (Internal mode). Select L and R channels.
Preview Output
Headphone cue bus. Select L and R channels.
FX Return Output
External effects return. Select L and R channels.
Input Routing
Configure input channels for external audio sources.
External FX Input
Select L and R input channels for receiving audio from external effects processors. Set to "not connected" if not using external FX.
VST Plugin Manager
Manage your VST/AU plugin library.
Plugin List
Shows all detected plugins with name and manufacturer. Displays total count of available VST plugins.
Scan for Plugins
Click to scan for new plugins. Shows progress during scanning.
Warning: Third-party VST plugins may significantly impact system performance and stability. We strongly recommend comprehensive testing in a controlled environment before live performance.
Controller Manager
Create custom MIDI and keyboard mappings to control Kuartz with your DJ controller or computer keyboard.
Device Selection
Select the MIDI device or Keyboard to configure. Detected MIDI controllers appear in the device dropdown. Use "Keyboard" to map computer keyboard keys.
Assignments Table
Shows all mappings for the selected device. Each row displays:
- • Control - The Kuartz function being controlled
- • I/O - "In" for input controls, "Out" for LED feedback
- • Assignment - Target (Global, Deck 1-4, or FX rack)
- • Mode - Controller type (Button, Fader, Encoder)
- • Mapped To - MIDI message (e.g., Ch01.CC.007) or key
- • Comment - Optional description
Adding Mappings
IN
Add input mapping (control Kuartz from your device)
OUT
Add output mapping (LED feedback from Kuartz)
Duplicate
Copy selected mapping to create similar one
Delete
Remove selected mapping
Device Mapping
Configure the selected assignment:
- • Learn - Click then move a control on your device to auto-detect the MIDI message
- • Reset - Clear the current mapping
Controller Type Options
| Type | Options |
|---|---|
| Button | Mode: Toggle or Hold. Invert option. |
| Fader | Invert option for reversed faders. |
| Encoder | Mode: 7Fh/01h or 3Fh/41h. Interaction: Direct or Relative. Sensitivity (0-300%). Acceleration (0-100%). |
| LED | For output mappings - sends feedback to controller LEDs. |
Mappable Commands
Global
- • Play, Stop, Pause, Play/Pause Toggle
- • Seek Position
- • Global BPM
- • Master Volume
Per Deck (1-4)
- • Track Volume, Mute, Solo, Preview
- • EQ Low, Mid, High
- • Filter
- • Send 1, Send 2 Level
- • Loop Active, Loop Size
FX Racks (Master, Send 1/2, External)
- • Effect Bypass (slots 1-10)
- • Effect Dry/Wet (slots 1-10)
- • Effect Parameters 1-32 (slots 1-10)
License
View your current license status and manage activation.
Current License Info
Displays your license type, email, and activation date.
License Types
FREE
15-minute session limit. Shows remaining time and Upgrade button.
ONE-TIME
No time limits. Shows purchased version.
MONTHLY
Subscription. Shows Manage Subscription button.
Deactivate License
Deactivate your license to transfer it to another computer. Requires internet connection.
Troubleshooting
No Audio Output
- • Check that the correct audio device is selected in Settings → Audio Device
- • Verify output routing configuration matches your hardware
- • Try increasing buffer size if you hear crackling or dropouts
- • Make sure your audio interface is connected and powered on
Controller Not Detected
- • Ensure controller is connected via USB before launching Kuartz
- • Check Settings → Controller Manager to see if device appears
- • Try a different USB port or cable
- • Restart Kuartz after connecting the controller
- • Only class-compliant MIDI devices are supported (no proprietary drivers)
Performance / CPU Issues
- • Reduce number of active VST plugins
- • Increase audio buffer size (adds latency but reduces CPU load)
- • Use "Fast" time stretching quality for live performance
- • Close other applications to free up system resources
- • Press F12 to view performance overlay
Tracks Not Importing
- • Verify file format is supported (WAV, MP3, AIFF, FLAC, OGG, M4A)
- • Check that files are not corrupted or DRM-protected
- • Wait for analysis to complete (check Status column)
- • Try navigating to the file location using the browser's folder tree
License / Activation Issues
- • Ensure you have an active internet connection for license verification
- • Check your email for the license key we sent after purchase
- • Copy and paste license key exactly as received
- • One-Time licenses work offline after initial activation
Still Need Help?
Can't find what you're looking for? Our support team is here to help you get the most out of Kuartz.